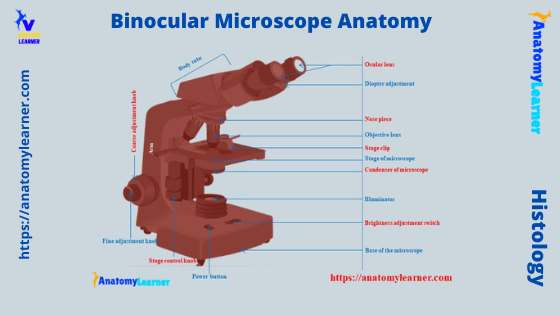
It is essential to know the binocular microscope anatomy for the first-year veterinary student before starting histology learning. This article might help you know different parts of the binocular compound microscope with a labeled diagram.
Most first-year students don’t know how perfectly set up a slide under the light microscope. So, I planned to tell you the exact process so that you may set your first slide perfectly under the binocular microscope.
Again, I will show the difference between binocular and monocular microscopes at the end of this article. So, this single article will teach you all about the different types of microscope anatomy.
Binocular microscope anatomy
There are different microscopes, but mostly light compound, light simple, electron, and pocket microscopes are widely used for the veterinary study. I will discuss anatomy learners’ different parts and functions of all these microscopes.
But, let’s know what the light compound microscope is. This optical device uses visible lights for illumination and lenses to magnify the tissue samples for details visualization.
Again, in a light compound microscope, you will see monocular, binocular, and trinocular or multicolor types. They are classified based on the eyepiece or ocular lens.
This type of microscope, the bright field microscopy as a bright background, is used to visualize the tissue section. Again, this microscope is the best suited to visualize the stained tissue section (by standard histological technique – H&E staining).
Now, let’s see what the important parts that you should know from the light binocular compound microscope anatomy are –
- Based on the microscope,
- Light switch of the microscope,
- Brightness adjustment switch,
- A condenser of the microscope,
- The illuminator of the microscope,
- Coarse and fine adjustment knobs,
- Stage control knobs of the microscope,
- Mechanical stages of the microscope,
- Frame or arm of a microscope,
- Objective lens (10X, 20X, 40X, and 100X),
- The nose piece of a microscope,
- Head part of the microscope,
- Ocular lens or eyepiece of the microscope,
- Diopter adjustment of the eyepiece
All of these parts are identified in a light microscope labeled diagram. So, first, make sure you can identify all these parts from this labeled diagram.
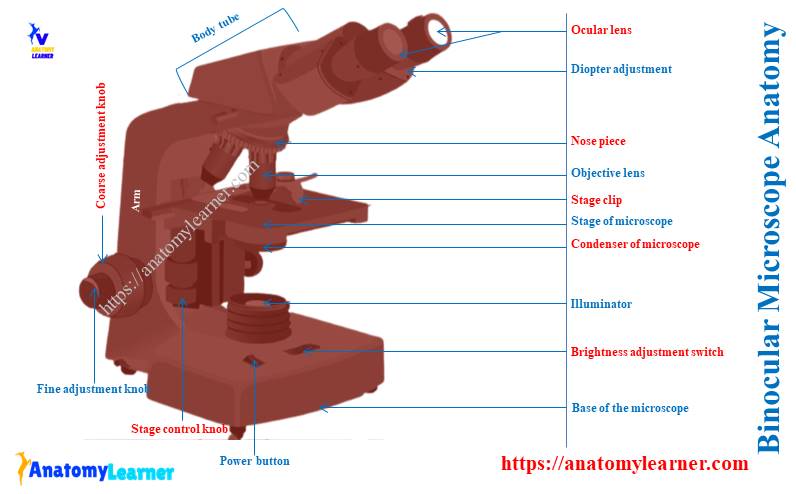
Parts of the compound microscope
Have you noticed that some parts of the compound microscope are directly related to the lens’s optics? And the other parts are not directly related to the microscope’s optics.
So, you will find two main parts in a light binocular compound microscope – optical and non-optical. The optical part of the compound light microscope includes –
- Condenser with iris diaphragm,
- Illuminator (light source),
- An objective lens of the microscope, and
- The eyepiece or ocular lens of the microscope
So, the other parts of the microscope (except these four) are included under the non-optical components. Let’s go for a short description of the different parts of the light compound microscope.
Optical parts of the microscope
The microscope’s condenser is the structure that collects and focuses light from the light source. You will see an aperture in the condenser that controls the amount of light coming through it.
A standard light microscope possesses three to five objective lenses that range in power from 10X to 100X. If you want to use the 100X objective lens, you might use the oil immersions. These objective lenses collect the maximum light from the object to form a high-quality magnified image.
The eyepiece may be monocular, binocular, or multiocular with a power of 10X. The viewer or examiner observes the magnified image through the ocular lens.
The eyepiece is the final stage of the microscope’s optical path and produces the magnified virtual image. You will also find a diopter adjustment that adjusts the focusing of the ocular lens.
Non-optical parts of the microscope
First, see the body and arm of the light compound microscope. The body tube is a cylindrical-like structure that connects the ocular lens to the objective lenses.
Again, the arm of the microscope connects the body tube to the microscope’s base.
You will see the coarse and fine adjustment in the arm of the microscope. The coarse adjustment of the microscope is the mechanical knobs that bring the tissue section into the general focus. Again, the fine adjustment fine-tunes the focus and increases the details of the tissue section.
The nose piece of the microscope can rotate and holds the objective lenses. Another important part of the light compound microscope is the flat stage where the slide is placed and perpendicular to the optical pathway.
You will see the stage clips and stage control knobs in the stage of a microscope. Again, the base supports the microscope, and there are different switches and parts in the base like a power button, illuminator, and brightness adjustment.
I hope you learn the basic parts of the light compound microscope briefly. Now, I will discuss the details anatomy of the light compound microscope with the labeled diagram.
Why it is called binocular: because it has two ocular lenses or an eyepiece on the head that attaches to the objective lens, this ocular lens magnifies the image produced by the objective lens.
Binocular microscope parts and functions
Now, I will provide detailed information on the different parts of the optical and nono-optical segments of a light binocular compound microscope. The functioning of the microscope is based on the lens’s optics (optical part).
First, let’s discuss the different structures from the optical part of the light microscope.
The illuminator of the microscope
In the past day, the older mononuclear microscopes used a concave mirror to reflect light from the external source (nature). It was a beautiful light source with a unique constant color but had a drawback. The light did fluctuate in intensity on a cloudy day and did not work at night.
But, nowadays, the most advanced light microscope uses artificial light sources (illuminators) with low voltage bulbs for transmitting lights. So, the brightness of the light can be adjusted with the brightness adjustment switch.
Two illumination methods are used in the light compound microscope – Kohler illumination and critical illumination methods. Among these two illumination methods, the Kohler illumination is the standard, which is applied to most modern microscopes.
This Kohler illumination method uses the optics that place the filament’s image in the objective lens’s back focal plane. Small, inhomogenous, and coiled filaments may use as the light source in the Kohler illumination method.
Again, in this method, the light source is completely out of focus in the viewer’s eye.
On the other hand, the critical illumination method is a very different method compared to the Kohler illumination. In this method, it forms a real image of the light source in the tissue section plane.
But, the major problem of this critical illumination method is that it requires a more homogenous light source. Again, a wide and ribbon-like filament may use for the light source in this critical illumination method.
Parts of the illuminator
Now, I will show the illuminator’s different parts used in most light compound microscopes. These structures are located through the microscope’s base and designed differently in a different light microscope.
Fine, let’s see the different parts of the illuminators –
- Lamps of the illuminator,
- Collector lens,
- Concave mirror,
- Diffuser and different types of filters,
- 45-degree angle mirror,
- Field lens and diaphragm of the illuminator
- The diagram shows different parts of the illuminators of the light compound microscope.
- Lamps and concave mirror of the illuminator
The modern binocular microscope uses different types of lamps. These lamps maintain the brightness and color temperature throughout the microscope’s lifetime. Again, in some microscopes, you will find a concave mirror behind the lamp to increase the intensity of the light.
Different types of lamps for microscopy are listed below –
- Tungsten lamp – used for general and photography; the intensity is high in tungsten lamps,
- Tungsten halogen lamp – also used for general and photography,
- Xenon arc lamp – used for general and motion picture photography,
- Zirconium arc lamp – has moderate intensity and use for general and photography,
- Mercury vapor lamp – used for fluorescence microscope,
But, most modern light compound microscopes use the tungsten halogen lamp. Generally, 6 to 12 volts may be provided by a different transformer to this tungsten halogen lamp. This voltage will provide the proper color temperature for photomicrography.
You know the illuminator has a different color balancing and heat absorbing filters (which will be discussed in the next section). These filters of the illuminator also affect the color temperature of the light.
Collector lens of the illuminator
If you see the illuminator diagram, you will see a collector lens located in front of the tungsten halogen lamp. It focuses an image of the lamp’s filament onto the front focal plane of the field lens.
This collector lens also magnifies the image of the lamp’s filament towards the microscope’s condenser. The fluorescence microscope that uses mercury vapor has an adjustable collector lens.
Filters and diffuser of the illuminator
You will see diffusers and different types of filters in the structure of an illuminator of a microscope. Normally in a compound microscope, you may find the following filters –
- A heat-absorbing filter,
- Various colored filters, and
- Neutral density filters
The heat-absorbing filter has a light blue color that can affect color micrographs. These absorbing filters are used to reduce infrared light that passes into the microscope’s optical system.
Again, in the modern compound microscope, various color filters may be used to affect contrast and color temperature. There are also some neutral density filters in the modern microscope that alter the intensity of the light without changing its color.
Mirror, filed lens, and field diaphragm of the illuminator
In the outer part of the illuminator, you will see three structures – 45 degrees angled mirror, field lens, and filed diaphragm or iris. The mirror is flat and easily damaged. This mirror of the illuminator structure directs the light into the field lens.
An additional lens is present near the illuminator’s field iris or diaphragm. This additional lens works with the collector lens and produces a real image of the filament. This image is properly located in the condenser’s front local plane.
Again, the field iris or diaphragm locates on the condenser front focal plane. This field iris limits the area on the tissue section that is illuminated.
A condenser of the microscope
The microscope’s condenser is another important lens that collects and focuses light from the source to the tissue sample. It is close to the microscope stage and has an aperture known as the iris diaphragm. The main function of this aperture of the condenser is to control the light coming up through the condenser.
The microscope condenser from a light cone with a sufficiently large angle. And it fills the entire back focal plane of the objective lens.
The function of the aperture iris is the same of the photographic lens. If you stop the iris down, it will reduce the light intensity and increase the depth of the field focus. This will also increase the contrast in the specimen image and reduce the resolution.
The angle of the cone of illumination will reduce if you close the condenser of a microscope.
So, the principal use of the condenser diaphragm or iris is to adjust the contrast of the tissue sample. If the aperture is closed, the light comes into the center, and the contrast will be high. Again, if the aperture of the condenser opens, the image will be brighter, and the contrast will be low.
The objective lens of the binocular microscope
If you see the light microscope diagram, you will find a different objective lens that attaches to the nose piece. Usually, you will find three to four objective lenses on a light microscope – 4X, 10X, 40X, and 100X.
Again, the eyepiece lens has 10X power so you will get a total of 40X, 100X, 400X, and 1000X magnification. The shortest lens has the lowest power, whereas the longest lens has the greatest power.
The microscope’s objective lens is responsible for the magnification of the image of the tissue sample. Again, the type and quality of an objective lens influence the performance of the light compound microscope.
What are the main functions of the objective lens of the light compound microscope anatomy? Well, the objective lens of the light binocular compound microscope collects maximum light from the specimen. Again, they form a high-quality magnified real image.
The eyepiece or ocular lens of the microscope
The eyepiece or ocular lens of the microscope provides the second level of image magnification. A viewer or examiner looks through the eyepiece or ocular lens to observe the magnified image. You will find a different number of eyepieces on the light microscope.
The eyepiece of the light microscope may be monocular, binocular, or trinocular (combined with photo binocular). This eyepiece of the microscope has 10X power, and it produces a magnified virtual image.
Again, you will see diopter adjustment in the advanced light microscope that adjusts the eyepiece’s focusing.
Binocular tube
In a binocular microscope, the two eyepieces are connected to the stand by the binocular tube. You will see two types of binocular tubes that differ in their uses. The two types of binocular tubes are rotational and translational.
Each the microscopist must adjust the interpupillary distance of the binocular tubes to achieve a unified circular field. The eyepiece of the translational type binocular tube moves horizontally when adjusting the interpupillary distance.
The distance between the objective’s back focal plane and the ocular’s front focal plane may change. In this stage, you need some little corrections like –
- Automatic tube correction,
- Both tube adjustments,
- One adjustment and one fixed tube, and
- Neither tube adjustment
The eyepiece of the microscope is sometimes adjustable along with the binocular tube.
In some microscopes, the correction is done automatically, and the binocular tube moves in or out. One eyepiece will be focusable, and interpupillary distance makes a circular field of view.
Again, in some microscopes, both tubes are adjustable. Each tube will have a scale, and there will be a scale between the tubes.
You should first turn the tube scale at 0 positions and set the interpupillary distance. Then, you should adjust the scale on each eyepiece tube to match the reading.
You should carefully focus the microscope on the tissue sample using the dominant eye. Then, again carefully focus the tissue sample for the other eye using the focusable binocular tube.
Again, some light compound microscopes have one tube adjustable or neither tube adjustable.
Rational binocular tube
If the light microscopy uses the rational binocular tubes, no change occurs in length. Again, there is no requirement for adjustment. The images produced in the rational binocular tube rotate together with the ocular lens.
The ocular lens of the rational binocular tube may focus easily and independently. Some modern microscopy uses both the rational and translational types of binocular tubes. These binocular tubes perform the sharp focus for one or both eyes by adjusting the ocular lens.
Non-optical parts of the compound microscope
The important non-optical parts of the light compound microscope are the body tube or head, arm or frame, fine adjustment, coarse adjustment, nose piece, stage, and base. Now, I will describe all these non-optical parts of the light compound microscope with the labeled diagrams.
The body tube of the microscope
The body tube is the solid support for the optical and mechanical parts of the microscope. There are two basic types of stand in the body tube of a light compound microscope – upright stand and inverted stand.
The upright stand of the body tube has a downward-facing objective lens. Again, the inverted stand of the body tube has an upward-facing ocular lens.
The main function of the body tube or head of the microscope is to connect the objective lens with the ocular lens.
Arm or frame of the microscope
The arm or frame of the microscope is also the cylindrical structure that supports the body tube. This arm also connects with the base of the microscope.
But, the shape and size of the arm of a microscope may be different in different types of a light compound microscopes. The main function of the arm of the light microscope is to carry the microscope along with the base.
Coarse and fine adjustment of a microscope
The coarse and fine adjustments of the light binocular microscope are also known as the focus knobs. In the modern microscope, you will see the more precise focusing knobs (both coarse and fine). But, sometime, you may find the medium focusing knob in some modern microscopes.
Again, the focus can be achieved by moving either the stage or the objective lens. But, what are the functions of the coarse and fine adjustment of the microscope?
The coarse adjustment focuses the tissue sample under the objective lens. First, you should always use it (coarse adjustment). The coarse adjustment is used only with the low power objective (10X).
Again, the fine adjustment will use with the high power objective to bring the sample tissue into a better focus. That means the fine adjustment of the microscope will fine-tune the focus and increase the details of the tissue sample.
The individual viewer or examiner should adjust the fine according to their eye vision to observe the tissue section.
The nose piece of the microscope
The nose piece of a light compound microscope is a revolving turret that carries the objective lens. In some the compound microscope, the nose piece move when the focus is adjusted.
The objective lens arrangement on the nose piece increases order magnification clockwise. Thus, an examiner or slide user may rotate the nose piece to select the different objective lens.
Stage and base of the binocular microscope
The stage of the microscope carries the slide. Let’s see the microscope labeled diagram; you will find the flat platform where the slide is placed. Again, this microscope stage lies perpendicular to the optical system or pathway.
In some microscopes, the stage can move when the focus is adjusted. Again, the microscope stage is often designed with mechanical devices for holding and moving the tissue sample or slide.
So, you will find two important structures in the stage of a light compound microscope –
- Stage clip and
- Stage control knobs
The stage clip of the microscope stage holds the specimen slide in a specific place. Again, the stage control knob moves the stage right and left or up and down.
In addition, you will find a vernier caliper in the microscope stage. With the help of this vernier caliper, the examiner or slide viewer can return to any reference point.
Again, an aperture in the middle of the microscope’s stage allows light from the illuminator. This light from the aperture will reach the tissue specimen.
The base is the bottom of the compound microscope. It uses support to the light compound microscope and holds different other structures.
You will see the illuminator and its power button on the microscope’s base.
Binocular microscope magnification
Do you want to calculate the binocular microscope magnification? This is so simple to calculate the magnification of the light compound microscope. The magnification is the proportion by which linear dimensions of the specimen are enlarged.
Again, it refers to the fact of the two lenses – the objective and the ocular lenses. They work together to produce the final magnified image projected onto the viewer’s eye.
So, the magnification of the light compound microscope may be calculated by the following formula –
- Magnification of the microscope = magnification of the objective lens x magnification of the ocular lens
Let’s provide an example of the microscope magnification to help you understand a clear concept. The 20X objective lens produces a tissue sample image that is 20 times larger than the actual image. Again, you know, there is 10X power in the ocular lens of the microscope.
So, the 10X ocular lens will also produce a 10 times hight magnified image than the 20X objective lens image. Thus, you will find the total magnification (in combined) = 20×10 = 200X.
Resolution of the microscope
The term resolution of the microscope is the minimum distance between the two points of the tissue sample that can easily distinguish. The normal eye can distinguish two points lying 0.2 micrometers apart if there is sufficient light.
The distance can be increased, and the eye can visualize objects closer than 0.2 micrometers by assembling a combination of the lenses. Again, the resolution of a light compound microscope may depend on the following –
- The wavelength of the light, and
- A numerical aperture that collects the power of the objective and condenser lens
Here, it would help if you also calculated the refractive index of media between the coverslip and objective lens. Again, it would help if you calculated the angle between the optical axis of a lens and the outermost ray.
How does the light microscope work?
Here, I will provide a schematic representation of how a light microscope works. First, the light from the light source enters the condenser lens. This light passes through the tissue sample or specimen and is magnified by the objective lens.
Further magnification has occurred at the second objective lens (ocular lens). The ocular lens produces the real magnified image (virtual, erect magnified). Then finally, the examiner or slide viewer can see the magnified virtual image.
How to use a binocular microscope?
First, I would like to provide a very short guide on using a binocular microscope. This is very important to focus the specimen under a light microscope. Here, I will share the step-by-step guide to focusing a slide or specimen under the light microscope.
- First, you should identify the coverslip of the provided slide by touching it with your fingertip,
- You should place the slide on the stage of the microscope in such a way that the cover slip facing up and fixed with the clip,
- Now you should switch on the light and adjust the condenser of the microscope,
- First, you should fix the specimen slide with the low objective lens (4X) to bring it with the line of the object,
- Now, if you want, you may change the objective power or lens (10X or 40X),
- It’s time to use the coarse and fine adjustment. First, you should use the coarse adjustment to focus, locate, and center the specimen or slide. Then, use the fine adjustment knob to bring clarity.
Now, you may move the stage by using the stage control knobs and observe the whole area of the sample tissue section.
Things you should check before using a microscope
But, before using the light compound microscope, you might check the following things. Check that your microscope is clean and there is no fingerprint or fluid on the objective and ocular lenses.
It would help if you placed your microscope a few inches from the table’s edge. It should be placed squarely in front of your left shoulder if you are right-handed.
Ensure the iris diaphragm is fully open and the objective lens is in the optical axis. Check that the stage, coarse adjuster, and fine adjuster are free from any problem.
You should set the illuminator control knob in the lowest setting before plugging on the main switch of the microscope. Now, let’s power on the main switch and adjust the light intensity to a comfortable setting that suits your eyes.
Let’s place a specimen slide on the microscope’s stage as I described before. You may use the stage adjustment knobs to center the specimen tissue slide on the microscope stage.
You may also use the coarse adjustment to raise the microscope stage slowly. But, before using the coarse adjustment, ensure you know the direction of the stage move when you turn the adjustment knob toward or away.
If you can not focus on the main point of the specimen before the stage reaches the high point, you may lower the stage slowly by using the coarse adjustment knob. Again, if you get the focus point, you may use the fine adjustment to fine-tune the tissue section.
Some other points you should consider
You may adjust the distance between the eye tubes as every person has a different distance between the pupils of their eyes. The position of the slide on the stage is very important. So, you should set the slide in the center of the stage so that you may see the details of histological features from the different areas.
You may use the different objective lenses by using the revolving nose piece to see the details and features of the same focused area of your tissue slide. Always you should use the fine adjustment knob to fine-tune the structural details of the specific area.
If you want to use a 100x objective lens, you need the oil immersion to visualize the details. Please ensure the objective lens touches the slide and then use the fine adjuster to clarify it.
Uses of the binocular microscope
The binocular microscope has various uses in the botanical, biological, investigation, medical, and educational fields. As a veterinary student, you may use this light compound microscope or bright filed microscope for the following different purposes.
- To understand the details structure of the cell and organelles from the animal tissue,
- Analysis of the different types of tissue from the animal body,
- Examination of the forensic evidence,
- To understand the specific protein structure and different atomic structures.
When you use the light microscope to analyze the details features of the animal tissue, you should prepare it. Then, it would help if you went for the routine stain (Hematoxylin and Eosin Stain) for your prepared tissue. Finally, examining your stained tissue sample under a light microscope would be best.
There is a long process to prepare tissue and stain it with the routine stain. You will find the details guide on tissue preparation and staining of it here in anatomy learner –
- Details guide of tissue preparation for microscopic examination
Again, I would like to provide a summary of the tissue preparation here for your easy understanding. Let’s see what the steps of tissue preparation for a microscopic examination are –
Steps of tissue preparation for microscopic examination
- Tissue collection: you may collect the tissue sample in different ways like scraping, dissecting, and autopsy.
- Fixation: you should fix the collected tissue using a fixative like formaldehyde or glutaraldehyde.
- Dehydration: remove the excess water from the tissue sample using a dehydrating agent like alcohol.
- Clearing: you should use xylene to clear the tissue sample.
- Infiltration: the clean tissue sample should be infiltrated with the melted paraffin.
- Embedding: now, the infiltrated tissue is placed in a small mold with melted paraffin and allowed to harden.
- Sectioning and staining: the sample tissue is cut into five to seven-micrometer thickness parts using the microtome. Then, the tissue is picked up on the clean glass slides under the water bath and kept drying in the air for some time.
Finally, the slide (with the sample tissue section) goes for the routine staining (Hematoxylin and Eosin staining). So, what will you see under the light microscope of the tissue sample stained with the routine stain?
You will see the cell structure with the nucleus, organelles, plasma membrane, and cytoplasm. But, honestly, some stained tissue can not reveal the plasma membrane. So, you will only see the cell with a nucleus, cytoplasm, and other structures within the cytoplasm of the sample tissue.
Slides (tissue sample) under the microscope examples
Let’s see some example tissue sections found under the light compound microscope. In the first slide, I showed the stratified cuboidal epithelium under the light microscope stained with the routine stain (hematoxylin and Eosin Stain).
Here, you will see the deep blue color nucleus and the pink color cytoplasm of the cells.
Again, let’s see the hyaline cartilage stained with the routine stain (from the trachea). Here, the tissue sample shows the different isogenous chondroblasts in the cavities, interterritorial matrix, and territorial matrix.
Again, this tissue section clearly shows the perichondrium, fibroblast in the perichondrium, and connective tissue.
Now, let’s see the esophagus tissue section under the light microscope, which was also stained by the routine stain. Here, you will find four different layers that contain different histological features.
The sample tissue’s first layer (tunica mucosa) shows the lining epithelium, lamina propria, and lamina muscularis. Again, the second layer (tunica submucosa) shows dense connective tissue with cells and submucosal glands.
The third layer is tunica muscular, which shows a smooth muscle layer that arranges into two layers – the inner circular and outer longitudinal layer. Finally, the fourth layer (tunica adventitia) shows loose connective tissue fibers, cells, blood vessels, and adipose tissue.
You also find other examples of the tissue sample and how they look under the binocular light compound microscope. Let’s find the other example tissue slides from the veterinary histology learning section and histology slide identification section.
Types of the microscope
There are different types of microscopes besides monocular, binocular, and trinocular. I will provide a little information on the other types of microscopes. But, first, see what the other type of microscopes that are commonly used in the medical field, research field, and biological field are.
- Electron microscope (another commonly used microscope in the medical field),
- Dark field microscope,
- Fluorescence microscope,
- Confocal and phase contrast microscopy
Let’s describe these microscopes with a little information, but you may read the details of these microscopies from another article by an anatomy learner.
Electron microscope – types and uses
This single article cannot provide all the data about the electron microscope (types, uses, and their principal). You see, most of the time, researchers or students use the light compound microscope that uses the light source to illuminate the tissue sample.
Again, this light compound microscope can magnify the real image up to 1500X. But, in the electron microscope, you will get the high resolution that results from using the electron as an illumination source.
Here, the electron microscope’s resolution is about 0.01 nanometer that can magnify a real image up to 300000x times. There are two main types of an electron microscopes – scanning electron microscope (SEM) and transmission electron microscope (TEM).
Let’s see the main parts of the scanning electron microscope (you will also understand the principal of the SCM) –
- Source of the electron,
- A column for the electron to travel with an electromagnetic lens,
- An electron detector device,
- The sample chamber,
- A computer and display to view the magnified image
But, the principal parts of the transmission electron microscope are slightly different than the scanning electron microscope. Here, in the transmission electron microscope, you should use the tungsten filament to make an electron beam in a vacuum chamber.
The transmission electron microscope also requires a thin slice of the tissue sample, less than 10 nanometers. Again, the formation of an image on the film in a transmission electron microscope differs from the scanning microscope.
Why should you use an electron microscope?
Using the electron microscope greatly benefits your study purpose or research. You will get the two main advantages of the electron microscope –
The electron microscope (second choice for a vet) has a much higher magnification and resolution compared to the normal light microscopy, and
It will provide the details structural features of the cell, tissue, and different organelles within the cells. You will easily understand every structure as clearly as the normal light microscope.
Other different types of microscopes
If you want to see the molecule’s position within the cell or tissue, then you need a fluorescence microscope. A fluorochrome is excited with the ultraviolet ray, resulting in visible fluorescence.
In the fluorescence microscope, you will find a bright image on the black background. Again, if you want to see the small particles like the bacteria, you may use the dark field microscope. You will get the low-resolution image by the dark field microscope.
But the finer structure’s details cannot be seen with the help of a dark field microscope. In this microscope, light enters the objective lens, which results in a bright image on the dark background.
Again, the confocal microscope is designed to illuminate an object serially, point by point. Here, the small beam of light is scanned across the object rapidly in an x-y raster pattern.
In addition, the phage contrast microscope allows object that differs slightly in refractive index.
Binocular microscope with camera
You may check different companies and compare if you want a binocular microscope for your research or histology laboratory. This will be better if you take the binocular microscope with the camera.
I have used different binocular and trinocular microscopes from good and different bands. I would like to suggest the following binocular microscope for you –
- Omax digital binocular microscopes,
- Olympus digital binocular microscopes,
- Amscope digital binocular microscopes, and
- Llutico siedentopf binocular micorosocpes
You may see the full guide here if you need help choosing the specific model from these microscopes.
Binocular vs monocular micorsocpes
The binocular microscope has two eyepieces or ocular lenses, whereas the monocular microscope possesses only one ocular lens. So, in a monocular microscope, you should use your left or right eye to view the sample tissue section through the one ocular lens.
On the other hand, you should use your two eyes in binocular microscopy as there are two ocular lenses. Binocular microscopy is better to use as they provide more comfort in viewing the structural features of the tissue samples.
Microscope anatomy labeled diagram
Now, I will show you the different parts of the different types of microscopes (like the binocular, monocular, trinocular, electron microscope, confocal microscope, and others) with the labeled diagrams.
First, let’s see the different parts of the monocular or trinocular microscopes. Here, I have identified all the parts of these microscopes. On social media, you may also find more diagrams on the different types of microscopes here for anatomy learners.
Again, the diagram I also shows the different parts of the electron microscope and a confocal microscope.
Frequently asked questions on the microscope.
Now, let’s see the questions asked by the microscopy learner or histology learners. I hope you will get your answers to the following questions on different types of microscopes, especially binocular microscopy.
What’s a binocular microscope used for?
The binocular microscope is used for biological research, studying the details of histological structures of certain cells, tissue, and organs from the animal body. They have also used forensic evidence analysis and studied the structures of the different proteins.
This type of microscope is very convenient and commonly used in biological research and studying for students.
What type of microscope is a binocular microscope?
These microscopes have two ocular lenses, and they are under the binocular type. Again, if you find only one ocular lens or eyepiece, they are under the monocular type of microscope.
What is the difference between binoculars and a microscope?
Both are microscopes where the binocular types possess two ocular lenses or eyepieces. Again, you will find different types of microscopy that I have already described before. The most common microscopes are binocular, electron, and fluorescence microscopes.
What are the parts of a binocular microscope?
The optical parts of the binocular microscope include illuminators, condenser, diaphragm, objective lens, and eyepieces. Again, the non-optical parts of the microscope include the body tube, arms, coarse adjustment, fine adjustment, stage, base, and nose pieces.
What is the anatomy of a microscope?
The anatomy of a microscope means the different parts of the microscope. So, you have already seen that a microscope has two main parts (optical and non-optical parts).
What are the 12 parts of the microscope?
The 12 parts of the microscope include – illuminators, condenser, iris diaphragm, objective lens, eyepieces, body tubes, arm or frame, coarse adjustment, fine adjustments, nose piece, stage, and base.
Which microscope is used in anatomy?
If you are a student or instructor of anatomy, you need a microscope. For the anatomy study, you may use the light compound microscope. Again, you may also use the electron microscope for anatomy study.
Conclusion
I hope you got the basic idea of the binocular microscope anatomy. Before starting histology learning, you might have basic knowledge of the different parts of the light compound microscope. All the light microscopes like monocular, binocular, and trinocular have the same parts.
The optical parts of the binocular microscope are directly involved in forming the magnified image. In contrast, the non-optical parts of the light microscope help to form the magnified image indirectly. Besides using binocular microscopy, you may also use a pocket and electron microscope for your anatomy study.